Food & Drink
Cheesemaking 101: Beginner’s Guide to Making Delicious Fresh Cheese at Home
Why do so many people go the homemade route? The answer is simple – homemade food products taste much better than anything you will find on supermarket shelves. They’re also far healthier for you to consume. For this reason, people often raise farm animals for eggs, poultry, and meat, and brew their own beer.
Making cheese at home is another fun hobby that results in healthy and delicious produce. While commercial cheeses often contain additives, homemade cheese only contains the ingredients that you select. If you’re thinking of making homemade cheese but are unsure where to begin, I’m here to familiarise you with the basic steps and equipment you’ll need to start!
What Cheese Making Equipment Do I Need to Make Homemade Cheese?
If you’re a beginner at this hobby, the first thing you should get is the essential equipment needed to make cheese which includes a pot, thermometer, cheese baskets, cheese cloths, draining mats, and a strainer. You will also need a few critical ingredients, such as milk, rennet, and cheese culture. Here is a lowdown on each of these items:
- Milk: This is one of the most obvious items on the list, but also a crucial one in the cheese-making process. I suggest you use farm-fresh milk or stick to organic if you’re searching for a quick grab-and-go alternative from your neighbourhood grocery store. Almond, coconut, oat, cashew, and other non-dairy kinds of milk are also great alternatives if you’re vegan or vegetarian.
- Rennet: This represents a set of enzymes found in the stomachs of ruminant mammals. It coagulates milk and transforms curds into a solid or whey into a liquid.
- Cheese culture: This ingredient encourages the growth of good bacteria in milk, which results in a rich and complex taste. You will need a specific cheese culture for each type of cheese.
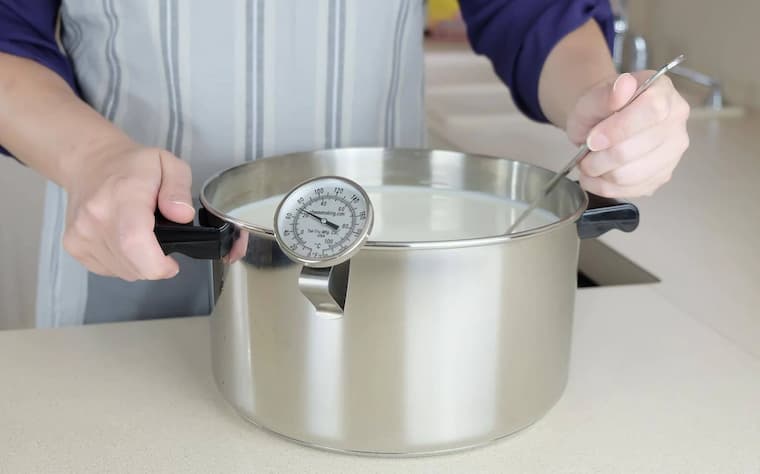
- Thermometer: When making cheese, a dairy or milk thermometer is used to measure the milk’s temperature. This piece of cheese making equipment comes with a clip that attaches it to the edge of your pot, making it easier to check the temperature inside.
- Large pot: In case you don’t already have a big pot made of stainless steel, you have to invest in this kind of piece of equipment needed to make cheese if you’re planning on making homemade cheese. As most cheese recipes ask for up to 6 litres of milk, be careful to allow space for stirring and any other additional ingredients when choosing which pot to buy.
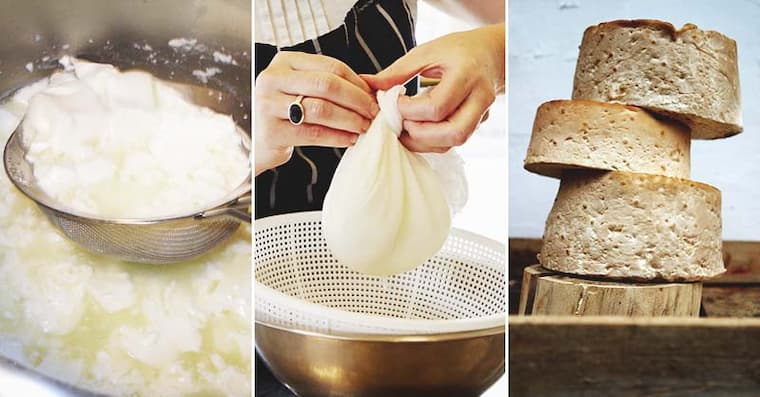
- Cheese basket: These baskets are used for draining cheese and come in different shapes and sizes.
- Cheese cloths: They help hold the cheese curds together by eliminating extra whey from the curds. These pieces of cheese equipment are quite versatile – even if you don’t use them to make cheese, you can still use them to thicken yogurt, filter coffee, strain custards, and more!
- Strainer: This is used to drain the whey from cheese curds. Make sure to use a non-reactive plastic or enamel strainer for safety reasons.
- Draining mats: Use a draining mat, especially for soft or matured cheeses, to dry and age them. When air moves around the cheese, these mats help in draining away whey and allowing the cheese to air dry.
8 Essential Steps for Making Cheese at Home
- Making the perfect homemade cheese is a matter of patience, practice, and quality home cheese making equipment. While there are many different methods of cheese-making, I’ll share with you the eight basic steps that I use myself:
Make sure your milk is warm and fresh: Your cheese will taste better the finer and fresher the milk you use. I prefer to get my milk the same day as I make cheese. - Add culture: The first “fork in the road” in the process of making cheese is how to acidify the milk. While some prefer directly pour acid (vinegar or citric acid), I usually add cheese cultures. These cultures will consume the lactose in the milk and convert it to lactic acid given enough time, warmth, and an absence of competing bacteria.
- Add the coagulant: Rennet is the most popular coagulant, which makes the milk proteins bind together. After combining the milk and coagulant, wait for a gel to develop.
- Test the firmness of your gel: After rennet interacts with the milk for some time, your mixture will change from a liquid to a gel. Check if the milk is firm enough by applying pressure to its surface (with a clean hand, of course).
- Cut down the curd: When you get a giant blob of curd, it’s time to cut it into smaller cubes. You can achieve this with a “cheese harp”, a whisk, or an ordinary knife. The size at which you chop the curds will have a significant impact on how moist your finished cheese is (the cheese will be drier if the initial pieces are smaller, and vice versa).
- Stir, cook, and wash: The next step is stirring the curds and turning up the heat so that they start cooking. This is when acid develops inside the curd and starts drying due to continuous stirring. After this, there’s the washing process when the cheese and cheese paste become softer, sweeter, and more elastic.
- Draining the curds: Empty your pot’s contents into a colander, press them down and wait for them to drain. At this stage of the process, you should work fast to retain the heat in the curds and encourage them to mush back together to make a lovely, smooth wheel. The cheese crumbles and the curds turn chilly if you wait too long.
- Salt and age your cheese: Add salt after separating the curds and the whey. Alternately, you can squeeze the cheese into a wheel before salting it and transfer the curds into their final moulds (or baskets).
If you have some free time and the right equipment, you can make the most delicious cheese from the comfort of your own home. So, hop on this modern trend and make your first batch of homemade cheese today!