Industry
Installation Guide – the Whole Story Behind Tailgate Hardware Replacement
Maintaining the load in your pickup shouldn’t be left only to the tailgate, instead, bungee cords or tie-down straps should also be used to keep the load from going back and forth. Although the tailgate has one simple thing to do, you shouldn’t rely on it entirely, not just for safety reasons but also to avoid buying a new one. However, if that is the case, finding the right one should be easy as you only need to know the make and model of your vehicle. Installing it though requires more than just knowing what tools you’ll need. Since there is a specific set of hardware that goes with it, you’ll need to be armed with all the right info, which is what we are here for today.
What You’ll Need
First, we’ll go over the materials and parts you’ll need in order to make things work together. Obviously, first on our list is the tailgate, then you have the inside lock cover plate, the tailgate hardware replacement handle and locking mechanism, connection bushings and two latches to keep the tailgate closed and locked. When it comes to the tools, you’ll need a ratchet, flathead screwdriver, Torx bit, needle nose pliers and various sockets.
Removing the Old
Removing the old tailgate will require you to unscrew the Torx bolts found on each side and since these are the bolts that hold the retaining cable too, you’ll need to have the tailgate fully supported beforehand. After you remove these bolts, set the tailgate at 45° angle and slide-out the passenger side out of its connector. In this point of the process, you will also transfer the old parts into the new tailgate including the tailgate hardware replacement handle and locking mechanism.
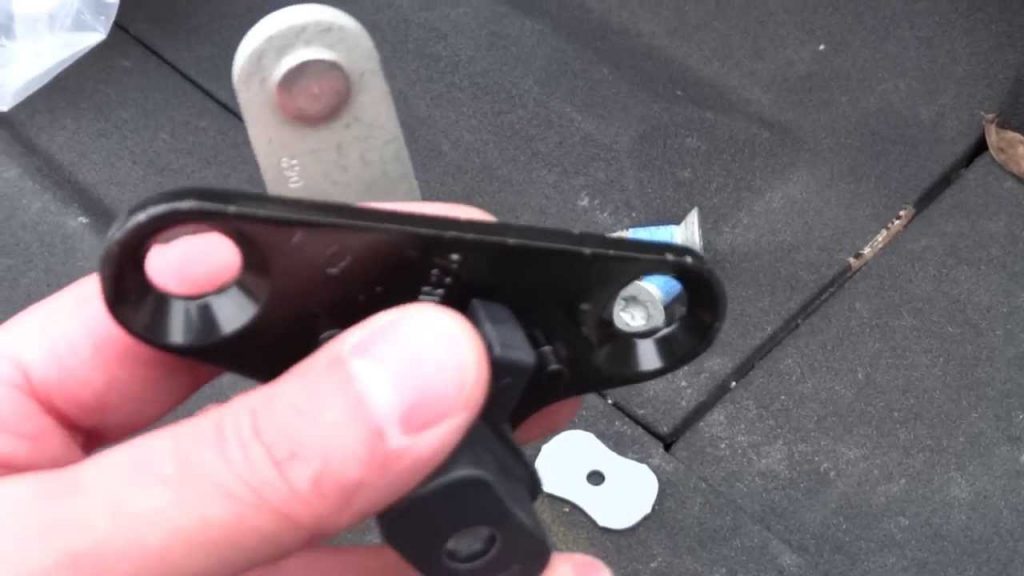
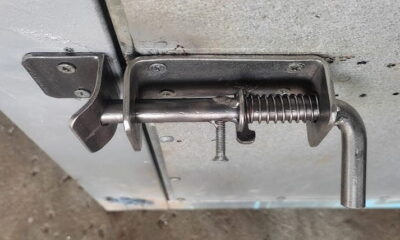
Move on by removing the 8 Torx screws on the lock cover plate in order to get to the locking mechanism and latches. You’ll then remove the lock mechanism by releasing the actuator rods from the two connectors and then unscrew the two bolts that hold the mechanism in place. Afterwards, go ahead and remove the two clips that that keep the actuator rods to the tailgate by squeezing the tip of the clip gently using the needle nose pliers and then push the clip down.
Removing the latch will require you to unscrew only one of the Torx bolts that hold the latch and then slip it out which you will repeat on the other side as well. As the final part of the removal process, you will get rid of the old plastic bushings from the connectors and remove the emblem of your vehicle.
Installing the New
You will start by putting the latch in the new tailgate but only with the last bolt you took out just so it holds in place – you’ll be placed them properly once the tailgate is back on the truck. After that, you’ll slide the handle side of the locking mechanism in the front of the tailgate and lay it on the ground. Then you will slide the backplate over the two bolts and hand tighten the nuts on them, but make sure you leave enough space so you are able to place the actuator rods in the clips.
Once you connect the rods in their clips, make sure you latch them down and slide the retaining clips that hold the rods towards the hole for the clip and snap them in place. With this done you will tighten the nuts completely and attach the bushing to the main connectors. You will then finally slide the tailgate with the driver side first and then at a 45° angle the passenger’s side and then completely fasten the Torx bolts for the latch on both sides. At last, you will place the lock cover plate with the tailgate completely open and then add the emblem back as the final step of this process.


You must be logged in to post a comment Login